Unit 2: Digital Inputs and Outputs
Pushbuttons: Just a button. Has two legs that connect to power and ground.
In this unit, you will add a pushbutton to the circuits you created in Unit 1. This will give you the chance to learn:
- How buttons work
- What a digital signal is
Circuit 3: LED, Pushbutton
Now, we will add a pushbutton to the LED circuit. Wire the circuit shown below. Instead of using a battery, we will use the 5V and ground pins on the Arduino. Keep in mind, this circuit will work without code, whereas the one later on will only work if you have uploaded a code to the Arduino.
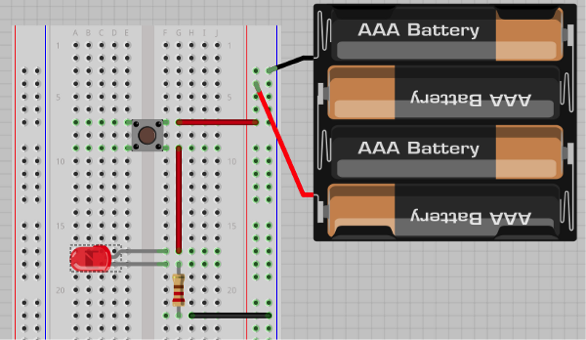
You can see that instead of the longer end of the LED being directly connected to the power supply, it is connected to one leg of the pushbutton. DON'T FORGET THE RESISTOR THAT IS CONNECTED TO THE LED. Experiment with pushing the button. What happens? What do you think the button is doing that allows this to happen?
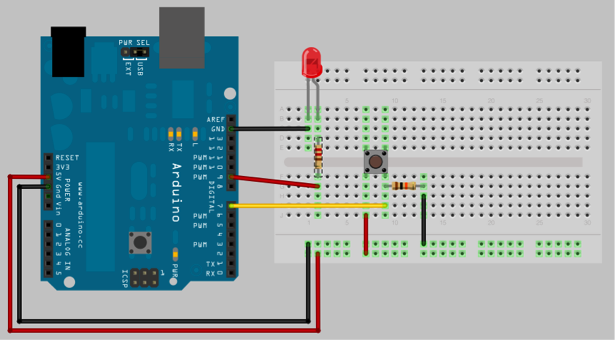
This is an example of manipulating an output using hardware, or physical components. We can also achieve the same effect through code. Open a new sketch and wire the circuit shown below. As you can see, the wiring is a bit different because now the LED and button are not directly connected but are instead connected to the Arduino.
Circuit 4: LED, Pushbutton with Arduino
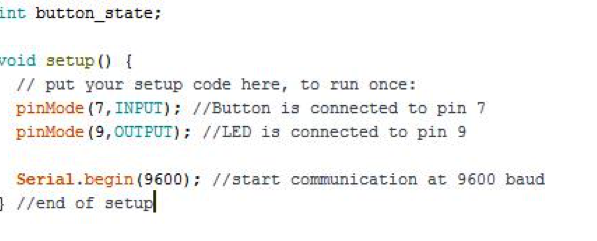
Before we start the setup, we will create a variable that will be used throughout the code. This variable will be used to represent whether the button is pushed or not; in other words, the state of the button.
In your code, we will still need to declare the LED as an output. We will also declare the pin the button is connected to as an input. The last part of our setup is starting the communication between the Arduino and the computer. This is done by adding a Serial.begin() line. The number between the parentheses indicates how quickly the Arduino and computer communicate in bits per second (baud). For now we will use 9600 baud.
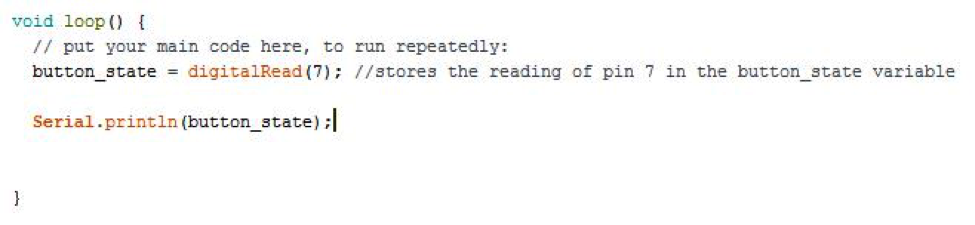
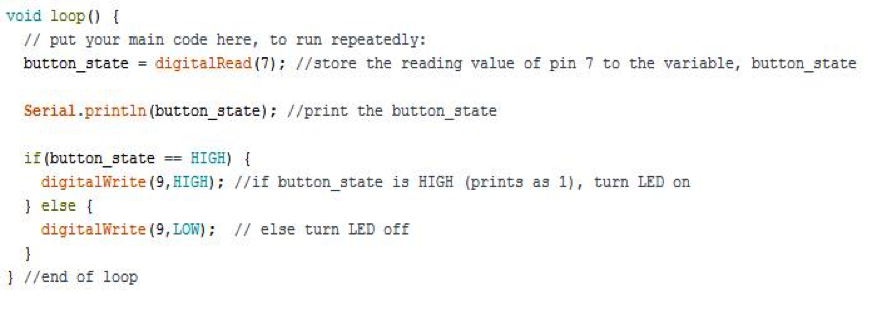
The function of the main code is to turn the LED on and off depending on whether the button is pushed or not. In order to do this, we need to know the state of the button. digitalRead allows us to read the state of the button. We will use the variable we created at the beginning of the code to store this value that is being read.
The next line of code will print the state of the button to the serial monitor using Serial.println(). In this example, we want to print the variable that represents the state of the button. Add this line of code as shown below and upload. The upload button is the arrow pointing sideways in the top left corner of the Arduino window.
Open the Serial Monitor in Tools, make sure the number in the bottom right of the window is set to the correct baud rate. You should be able to see either 0 or 1 scrolling down. Experiment with pressing the button and see how that value changes. The 1 and 0 can also be referred to as HIGH and LOW respectively. For this example, we want the LED on when the button is pushed, or when the reading is 1. To do this we will add an if...else statement. This will tell the code to execute a certain command if a condition is true. Else it will do a different command. The condition in this example is the state of the button.
Now we need to tell the code what to do if the condition is met or not met. For example, if the button is pressed, we want the LED to turn on. Else, the LED should turn off. The if...else statement will look something like this and will still be in the overall loop function. Pay attention to the curly brackets that come at the beginning and end of the if...else statements as well as the use of HIGH and LOW.
Using code to turn the LED off and on rather than wiring the button directly to the LED may have seemed like more work, however using code to manipulate an output gives you a lot more freedom and will let you do more effects as you will learn later on.
Questions:
- Now that you have learned digitalWrite and digitalRead, what do you think digital means? (Hint: how many options to do you have for each command?) This may be obvious in the next section.